Table of Contents
Add Quit Menu to Finder
defaults write com.apple.Finder QuitMenuItem -bool YES
Show Hidden Files in Finder
defaults write com.apple.finder AppleShowAllFiles TRUE
Show Path in Finder Title
defaults write com.apple.finder _FXShowPosixPathInTitle -bool YES
Although, toggling View->Show Path Bar is a nicer option.
Screen Sharing Authentication Issues
In order to avoid authentication issues with Apple ScreenSharing, use your user's full name instead of the UNIX name.
Activate VNC from Command Line
Providing you have access via SSH, issue the following as the superuser:
/System/Library/CoreServices/RemoteManagement/ARDAgent.app/Contents/Resources/kickstart -activate -configure -access -on -clientopts -setvnclegacy -vnclegacy yes -clientopts -setvncpw -vncpw tron -restart -agent -privs -all
and then restart ARD:
/System/Library/CoreServices/RemoteManagement/ARDAgent.app/Contents/Resources/kickstart -restart -agent
Now you can connect via VNC (not Screen Sharing) to your computer by using the password tron.
Key Codes
These can be used with AppleScript.
| Key | Code |
|---|---|
| ' | 12 |
| , | 13 |
| - | 39 |
| . | 14 |
| / | 33 |
| 0 | 29 |
| 1 | 18 |
| 2 | 19 |
| 3 | 20 |
| 4 | 21 |
| 5 | 23 |
| 6 | 22 |
| 7 | 26 |
| 8 | 28 |
| 9 | 25 |
| ; | 6 |
| = | 30 |
| F10 | 109 |
| F11 | 103 |
| Key | Code |
|---|---|
| F1 | 122 |
| F2 | 120 |
| F3 | 99 |
| F4 | 118 |
| F5 | 96 |
| F6 | 97 |
| F7 | 98 |
| F8 | 100 |
| F9 | 101 |
| [ | 27 |
| \ | 42 |
| ] | 24 |
| ` | 50 |
| a | 0 |
| b | 45 |
| c | 34 |
| delete | 51 |
| down | 125 |
| Key | Code |
|---|---|
| d | 4 |
| enter | 52 |
| esc | 53 |
| e | 2 |
| f | 16 |
| g | 32 |
| h | 38 |
| i | 5 |
| j | 8 |
| k | 9 |
| left | 123 |
| l | 35 |
| m | 46 |
| n | 37 |
| o | 1 |
| p | 15 |
| q | 7 |
| return | 36 |
| right | 124 |
| r | 31 |
| Key | Code |
|---|---|
| space | 49 |
| s | 41 |
| tab | 48 |
| t | 40 |
| up | 126 |
| u | 3 |
| v | 47 |
| w | 43 |
| x | 11 |
| y | 17 |
| z | 44 |
Enable Dashboard Widgets on Desktop
Press F12 to show the dashboard, press the + sign and begin to drag an item onto the dashboard. While you drag the widget onto the dashboard, hit F12 again to drag the widget onto the desktop. The reverse can be accomplished to get rid of the widget.
defaults write com.apple.dashboard devmode YES
Installing MySQL Development Files
On OSX Server (Snow Leopard, at the time of writing), the development files for MySQL are not installed along with the binary files. This requires downloading the mysql current version (5.0.92):
mysql --version
mysql  Ver 14.12 Distrib 5.0.92, for apple-darwin10.0 (i386) using  EditLine wrapper
and compiling it in order to get the libraries and header files. This can be done by getting the tar.gz package for the MySQL version and compiling the package with:
MACOSX_DEPLOYMENT_TARGET=10.6 CCFLAGS="-arch i386 -arch x86_64 -g -Os -pipe" CFLAGS="-arch i386 -arch x86_64 -g -Os -pipe -no-cpp-precomp" CXXFLAGS="-arch i386 -arch x86_64 -g -Os -pipe" LDFLAGS="-arch i386 -arch x86_64 -bind_at_load" ./configure --prefix=/usr --disable-dependency-tracking --with-unix-socket-path=/var/mysql/mysql.sock --with-mysqld-user=mysql --with-ssl --with-extra-charsets=complex --enable-thread-safe-client --enable-local-infile --enable-shared --with-plugins=innobase --with-plugins=federated --with-mysqlmanager && make -j4
After which, we install using a fake root in order to extract just the libraries and includes:
make install DESTDIR=/usr/src/mysql
Then, we copy over the libraries and header files:
cp -Rap /usr/src/mysql/usr/{lib,include} /usr/
to the system. Now, programs that need the development files will find them and will blend with the system since we have been using the MySQL that the system has installed.
Disable World of Warcraft Error Reporting
The ported World of Warcraft binary contains a call to Error Reporting.app. The problem is that the error reporting service pops up more often than necessary, even if the error was not fatal. We can disable that by editing the binary and jumping to the end of the sub_3a3c function at 0x3a3c:
====== B E G I N   O F   P R O C E D U R E ======


                                       ; Basic Block Input Regs: <nothing> -  Killed Regs: <nothing>
                                    sub_3a3c:
00003a3c 55                              push       ebp                                   ; XREF=0xb849, 0x1a45bb, 0x1a4a24, 0x1a52a3, 0x1a5717
00003a3d 89E5                            mov        ebp, esp
00003a3f 57                              push       edi
00003a40 56                              push       esi
00003a41 53                              push       ebx
00003a42 83EC1C                          sub        esp, 0x1C
00003a45 E9E1000000                      jmp        0x3B2B
...
00003a97 C7442408B4736A00                mov        dword [ss:esp+0x8], 0x6A73B4          ; @"Error Reporter.app"
00003a9f 8B151420BB00                    mov        edx, dword [ds:objc_msg_stringByAppendingPathComponent_] ; XREF=0xc3686, 0xc3717
00003aa5 89542404                        mov        dword [ss:esp+0x4], edx
00003aa9 890424                          mov        dword [ss:esp], eax
00003aac E810CCBA00                      call       imp___jump_table__objc_msgSend        ; XREF=0x1e30a4, 0x1e3247
...
                                       ; Basic Block Input Regs: <nothing> -  Killed Regs: ebx esp ebp esi edi
00003b2b 83C41C                          add        esp, 0x1C                             ; XREF=0x3a45
00003b2e 5B                              pop        ebx
00003b2f 5E                              pop        esi
00003b30 5F                              pop        edi
00003b31 5D                              pop        ebp
00003b32 C3                              ret
                        ; endp
Turn Display Off
This following will turn the display off on non-PPC Macs:
- dimDisplay.c
#include <CoreFoundation/CoreFoundation.h>
#include <IOKit/IOKitLib.h>

int main(void) {
    io_registry_entry_t r = IORegistryEntryFromPath(kIOMasterPortDefault, "IOService:/IOResources/IODisplayWrangler");
    if(!r) return 1;
    int err = IORegistryEntrySetCFProperty(r, CFSTR("IORequestIdle"), kCFBooleanTrue);
    IOObjectRelease(r);
    return err;
}
Save the code to file called dimDisplayNow.c and then compile it with the following command:
gcc dimDisplayNow.c -framework IOKit -framework CoreFoundation -o dimDisplayNow
Reset Bluetooth Configuration
The following steps perform a complete reboot of the Bluetooth subsystem and may solve numerous issues with paired devices, ranging from headsets to OSX not detecting discoverable devices.
Make sure you either have a wired mouse before attempting this or that you have some external capability to use the computer because the following steps will temporarily disable your bluetooth devices.
- Launch Bluetooth Explorer (a utility installed as Part of Xcode).
- Select the “Modify Software & Device Configuration” from the Utilities Menu.
- Keep the first four checkboxes checked (one of those will say “Full Factory Reset”).
- Click “Perform Actions” on the lower-right portion of the window.
- Reboot (the “Reboot Now” Button may work, it it doesn’t just go with a normal reboot).
Enable ScreenSharing Remotely from Command Line
Use the command below to remotely enable ScreenSharing while having access only to the console. The command enables ScreenSharing for the user john, replace john with the user you want to enable ScreenSharing for.
sudo /System/Library/CoreServices/RemoteManagement/ARDAgent.app/Contents/Resources/kickstart -activate -configure -access -on -users john -privs -all -restart -agent -menu
Rebuilding Open Directory
When recreating OpenDirectory after previously having destroyed an Open Directory master, the output of mkpassdb -dump will be:
slot 0001: 0x00000000000000000000000000000001 disabled-slot-0x1
Even if you use 'mkpassdb -deleteslot 0x00000000000000000000000000000001 the disabled-slot-0x1 will be cleared but the slot itself will not be deleted.
The easiest is to remove /var/db/authserver and then recreate the Open Directory.
Keep Icons Arranged
Holding Alt down and right-clicking an empty place in the Finder will give you access to Keep Arranged By instead of Arrange By context menu.
Screen Shots
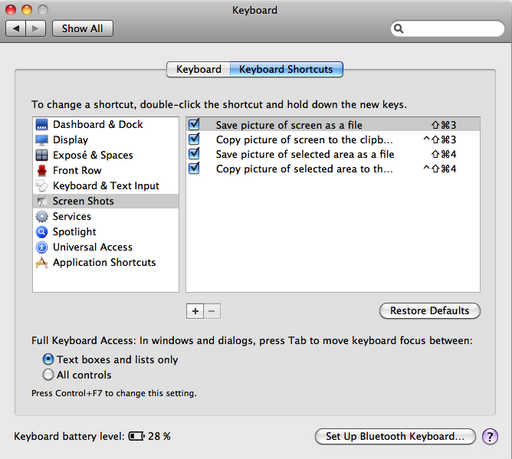
OSX has a screenshot shortcut built-in so there is no need for extra software. You will find it in the System Preferences...->Keyboard->Keyboard Shortcuts->Screen Shots:
Speed-up OSX
The operating system loads images into RAM, especially where the user-interface is concerned. An interesting idea would be to optimize the images and reduce their sizes in order to free up the RAM consumption and reduce loading times.
Perhaps the best tool to use is image_optim. After following the install instructions, images can be recursively optimized:
cd /; sudo find . \( -name '*.png' -o -name '*.jpg' -o -name '*.jpeg' -o -name '*.gif' \) -exec image_optim '{}' \;
 It is remarkable that Operating System vendors do not already perform these optimizations. This should already be performed at the vendor level since it is a very low-cost optimization with grand benefits. Think about all those images that are loaded once the user-interface is loaded, they have to all be read into RAM - perhaps disposed of later, but the shorter the bitcount, for either reading the image off storage or maintaining it in active memory.
Enable 64bit Kernel
Some machines and OSX versions combinations do not have the 64-bit kernel enabled by default. To check whether the kernel is enabled go to Apple->About This Mac->More Info...->Software and check the line in the right pane:
64-bit Kernel and Extensions: No
The 64-bit kernel can be enabled by downloading the K64Enabler.
OSX Boot Sequence Key Combos
From the Apple Knowledge Base, HT1342:
| Key Combo | Description |
|---|---|
| Alt | Display bootable device picker. |
| Shift | Safe Boot |
| C | Start from bootable media. |
| T | FireWire target disk mode. |
| N | NetBoot |
| X | Force OSX start-up if other bootable volumes are present. |
| D | Hardware test mode. |
| Cmd+R | Recovery (OSX Lion+) |
| Cmd+V | Verbose Mode (kernel printk, etc...) |
| Cmd+Alt+P+R | Zap NVRAM |
⏏, F12 or LMB or TrackPad | Eject removable discs. |
Note that if the keys do not seem to have any effect, that is due to Apple's idea of using a wireless keyboard such that the keyboard may not have established a connection to the computer after boot. This is particularly true of "post-Steve Jobs OSX" such as Yosemite onward. Use an external wired keyboard instead.
Changing Icons Without Extra Software
Instead of downloading extra software:
- load an image (
PNGpreferred for transparency) withPreview - select the whole canvas
- copy it
- open the
Get Info...pane of an icon - select the icon on the
Get Info...pane - paste
Alternate Activity Monitor
Alt+Cmd+Esc
Screen Capture
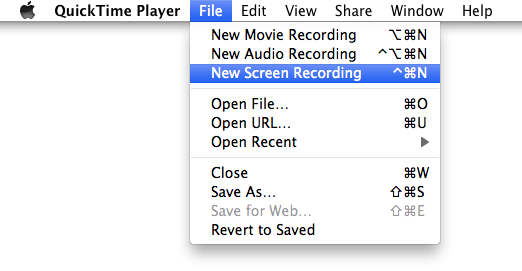
The QuickTime player that comes with OSX already contains a built-in function that allows you to capture the screen:
Increase TCP Parameters for Broadband
Add:
net.inet.tcp.mssdflt=1460
net.inet.tcp.sendspace=262144
net.inet.tcp.recvspace=262144
net.inet.udp.recvspace=74848
net.inet.udp.maxdgram=65535
net.inet.tcp.rfc1323=1
net.inet.tcp.newreno=1
net.inet.tcp.always_keepalive=1
net.inet.tcp.keepidle=3600
net.inet.tcp.keepintvl=150
net.inet.tcp.slowstart_flightsize=4
net.inet.tcp.strict_rfc1948=1
net.inet.tcp.delayed_ack=1
to /etc/sysctl.conf and then issue:
cat /etc/sysctl.conf | xargs sysctl -w
Hibernate and Sleep Mode
pmset -a hibernatemode 25 # always hibernate
pmset -a hibernatemode 3 # hibernate only when the battery is low
pmset -a hibernatemode 0 # to use ‘sleep’ mode (no hibernation, ever)
Installing Packages from Command Line
installer -pkg java.pkg -target /
Strip Architecture from Binaries
ditto --rsrc --arch i386 Safari.app Safari-i386.app/
Replacing Outdated Certificates on Leopard
cd /usr/share/curl/
curl -ksO https://www.digicert.com/testroot/DigiCertHighAssuranceEVRootCA.crt
sudo sh -c 'cp curl-ca-bundle.crt curl-ca-bundle.crt.old; cat DigiCertHighAssuranceEVRootCA.crt >> curl-ca-bundle.crt'
Compiling PHP 5.3.x on Leopard
After installing mysql using homebrew on OSX Leopard, PHP can be configured by issuing:
./configure \
	--prefix=/usr \
	--mandir=/usr/share/man \
	--infodir=/usr/share/info \
	--sysconfdir=/private/etc \
	--with-apxs2=/usr/sbin/apxs \
	--enable-cli \
	--with-config-file-path=/etc \
	--with-libxml-dir=/usr \
	--with-kerberos=/usr \
	--with-zlib=/usr \
	--enable-bcmath \
	--with-bz2=/usr \
	--enable-calendar \
	--with-curl=/usr \
	--enable-dba \
	--enable-exif \
	--enable-ftp \
	--with-icu-dir=/usr/local \
	--with-iodbc=/usr \
	--with-ldap=/usr \
	--with-ldap-sasl=/usr \
	--with-libedit=/usr \
	--enable-mbstring \
	--enable-mbregex \
	--with-mysql=/usr/local \
	--with-mysqli=mysqlnd \
	--without-pear \
	--with-pdo-mysql=mysqlnd \
	--with-mysql-sock=/var/mysql/mysql.sock \
	--with-readline=/usr \
	--enable-shmop \
	--with-snmp=/usr \
	--enable-soap \
	--enable-sockets \
	--enable-sysvmsg \
	--enable-sysvsem \
	--enable-sysvshm \
	--with-tidy \
	--enable-wddx \
	--with-xmlrpc \
	--with-iconv-dir=/usr \
	--with-xsl=/usr \
	--enable-zip \
	--with-kerberos \
	--enable-intl \
	--with-pcre-regex \
	--with-freetype-dir=/usr/X11 \
	--with-jpeg-dir=/usr \
	--with-png-dir=/usr/X11 \
	--with-mysql=/usr/local/Cellar/mysql/5.6.15
In order to compile, you need to add the following libraries to the EXTRA_LIBS field of the top-level Makefile:
-lresolv -lstdc++
After which, PHP will compile fine.
Disable Spotlight
Spotlight, along with the menu icon can be disabled by first turning indexing off:
mdutil -a -i off
then by disabling the icon:
chmod 600 /System/Library/CoreServices/Search.bundle/Contents/MacOS/Search
and finally relaunching the UI with:
killall SystemUIServer
Note that disabling spotlight will not disable searching for files in Finder. Spotlight is to OSX as Indexing Services is to Windows. If you frequently use spotlight just to launch applications, consider using a third-party application such as QuickSilver or Alfred that will not churr over the hard-drive by indexing every file.
Show Hidden Files
Issue:
defaults write com.apple.finder AppleShowAllFiles TRUE
and then restart Finder by Option-clicking the Finder icon and selecting "Relaunch Finder".
Switch Samba Protocol in Mavericks
Mavericks now uses SMB2 by default which is the samba protocol that is only supported in Linux kernels >= 3.6. If you are using a lower kernel version then OSX Mavericks should be told to use the old SMB1 protocol, especially if crashes are experienced. In order to do that, create a file called nsmb.conf in /Library/Preferences/nsmb.conf containing the lines:
[default]
smb_neg=smb1_only
After which a restart may be required to pick-up the changes.
Create Image File
To create a DMG out of a folder, issue the following command:
hdiutil create -ov -scrub -srcfolder folder/ -volname MyFolder folder.dmg
where MyFolder is some descriptive name.
Samba Optimisations
OSX tends to handle Samba better when Unix extensions are turned off on the server side, by adding:
unix extensions = no
in /etc/samba/smb.conf.
On the client-side OSX Samba clients can be made more responsive by creating a file in ~/Library/Preferences/ named nsmb.conf and adding the following options:
[default]
notify_off=yes
streams=no
Show Hidden Files
Issue:
defaults write com.apple.finder AppleShowAllFiles TRUE
after which restart Finder (Alt-click Finder and choose Relaunch) to show all files in finder, including hidden files.
Issue:
defaults write com.apple.finder AppleShowAllFiles FALSE
to hide the files.
Note that this only reveals the files in Finder but given a selection dialog, you will not be able to select the file. To unhide the file, see hide_and_unhide_files.
Hide and Unhide Files
This can be accomplished from the terminal using chflags. To hide a file, issue:
chflags hidden file
to unhide a file:
chflags nohidden file
Enable Disk Utility Debug Menu
defaults write com.apple.DiskUtility advanced-image-options -bool true
defaults write com.apple.DiskUtility DUDebugMenuEnabled -bool true
Change Host Name
To set the hostname, as root or using sudo issue:
scutil --set HostName name.local
where name is the host name of the machine.
Disable Access Times
When using a Solid-State Drive SSD it is useful to cut down the number of writes. We can disable file access times by creating a plist at /Library/LaunchDaemons/org.grimore.noatime.plist with the following contents:
- org.grimore.noatime.plist
<?xml version="1.0" encoding="UTF-8"?>
<!DOCTYPE plist PUBLIC "-//Apple//DTD PLIST 1.0//EN" "http://www.apple.com/DTDs/PropertyList-1.0.dtd">
<plist version="1.0">
    <dict>
        <key>Label</key>
        <string>org.grimore.noatime</string>
        <key>ProgramArguments</key>
        <array>
            <string>mount</string>
            <string>-uwo</string>
            <string>noatime</string>
            <string>/</string>
        </array>
        <key>RunAtLoad</key>
        <true/>
    </dict>
</plist>
and then restart the machine. We can check the status of the mounted drives by issuing:
mount
and the following is the output we are looking for:
/dev/disk0s2 on / (hfs, local, journaled, noatime)
Note the noatime option at the end.
Disable Swap
Swap is managed in OSX by a binary called dyanmic_pager:
ps ax | grep dynamic
gives:
50 ?? Ss 0:00.02 /sbin/dynamic_pager -F /private/var/vm/swapfile
to disable the dynamic_pager, first unload the plist:
launchctl unload -w /System/Library/LaunchDaemons/com.apple.dynamic_pager.plist
and then remove the plist (make sure to make a backup!):
rm /System/Library/LaunchDaemons/com.apple.dynamic_pager.plist
as well as the swap files (you do not have to backup these):
srm -rf /private/var/vm/swapfile*
and finally reboot the system.
Change Kernel Boot Mode (32-bit vs. 64-bit)
To check which architecture you are currently running under, issue in Terminal:
uname -m
which will output either i386 for 32-bit or x86_64 for 64-bit.
To change the boot mode, for example, from 32-bit to 64-bit issue:
systemsetup -setkernelbootarchitecture x86_64
and then reboot the system. To switch back to 32-bit, issue:
systemsetup -setkernelbootarchitecture i386
Change Log-in Window Background
sudo defaults write /Library/Preferences/com.apple.loginwindow DesktopPicture “/path/to/file.jpg”
Clear "Open With..." Menu
/System/Library/Frameworks/CoreServices.framework/Versions/A/Frameworks/LaunchServices.framework/Versions/A/Support/lsregister -kill -r -domain local -domain system -domain user
Boot Flags
The following settings can be set as boot parameters on OSX:
| Flag | Description |
|---|---|
-f | Force rebuild of the kernel extensions cache. |
-v | Verbose booting shows showing kernel and daemon information. |
-s | Boot into single user mode. |
-x | Boot into safe mode. |
-legacy | Boot into 32bit instead of 64bit mode. |
hd=disk0s1 | Force to boot a specific partition on a specific drive (BSD drive notation, means disk0 = physical disk 1). Here disk1 partition 1 is forced to be booted. |
Graphics Mode=1024x768x32@75 | Forces to boot with a resolution of 1024 x 768 with 32bit colours at 75Hz. |
Kernel=mach_kernel | Forces to load a specific kernel, helpful for testing of new kernels. |
cpus=1 | Force using only 1 CPU core, may help addressing issues |
idlehalt=1 | Allows the system to turn off cores for power management. |
platform=X86PC | Disables power management (disables ACPI). |
platform=ACPI | Forces the use of power management (enables ACPI). |
iog=0x0 | Will keep the screen dimmed after opening the lid on a laptop. |
kmem=1 | Enable memory debugging. |
They can be set by issuing as root:
nvram boot-flags="idlehalt=1"
In order to enable idlehalt.
Delete Kernel Extension Cache
Issue:
rm -rf /System/Library/Caches/com.apple.kext.caches
The caches will be recreated after a startup.
Disable Automatic Spelling Correct
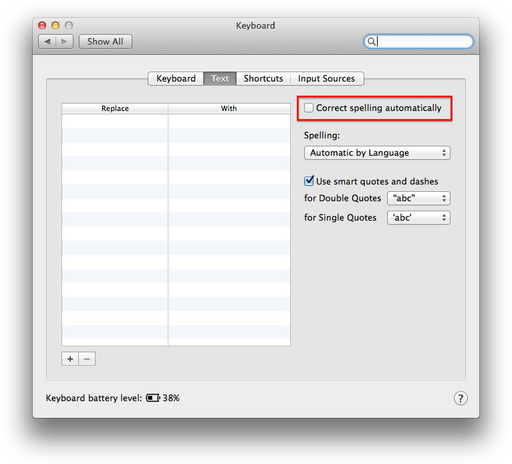
Automatic spelling correction is a feature shows up blatantly in programs such as Skype and it is very hard to get rid of due to the fact that it is a system-wide setting in OSX rather than a per-application setting. The feature can be disabled by going to System Preferences->Keyboard.
Turn IPv6 Off
On OSX versions prior to 10.7, IPv6 could be turned off from the Network settings. On latter versions, IPv6 must be turned off via the command line by issuing as root:
networksetup -setv6off INTERFACE
where INTERFACE is the name of the interface (eg: Wi-Fi, Ethernet, etc...)
Combining Multi-Architecture Binaries
One of the problems with cracking software such as ShareMouse is that some disassemblers can only produce binaries for a single architecture. The result is that you get two binaries, one of the architecture being cracked whilst the other remains uncracked. ShareMouse is a good example, because after copying the resulting binary to a different architecture you will notice that the application is seemingly untouched.
To assemble multiple architectures in one file, we can use lipo. First, produce the cracks for x86_64 and separately for i386 and, let's say, name them ShareMouse.x86_64.crack for the 64bit version and ShareMouse.i386.crack for the i386 version. You may notice that if you issue:
lipo -info ShareMouse.x86_64
you will notice that it actually contains both architectures even if you produced the crack just for x86_64. So, assuming that ShareMouse.x86_64.crack contains the crack for x86_64 and ShareMouse.i386.crack contains the crack for i386, we now extract the cracked architecture for x86_64:
lipo -extract x86_64 ShareMouse.x86_64.crack ShareMouse.x86_64.solo
and the cracked architecture for i386:
lipo -extract i386 ShareMouse.i386.crack ShareMouse.i386.solo
Now if you run lipo -info on the solo versions, you will see just one architecture - the one that contains the crack. The next step is to merge them together in one binary:
lipo -create ShareMouse.x86_64.solo ShareMouse.i386.solo ShareMouse
which will unite the x86_64 crack with the i386 crack and create an universal binary ShareMouse which contains the cracks for both architectures.
Fix File Permissions from Command Line
Done by calling diskutil with the repairPermissions option as root:
diskutil repairPermissions /
Switch Between XCode and Command-Line Tools
This is necessary sometimes if you get errors along the lines of:
xcode-select: error: tool 'ibtool' requires Xcode, but active developer directory '/Library/Developer/CommandLineTools' is a command line tools instance
which imply that you need to switch to Xcode.
To switch to Xcode use:
sudo xcode-select --switch /Applications/Xcode.app/Contents/Developer
To switch to command-line tools:
sudo xcode-select --switch /Library/Developer/CommandLineTools
Disable Adobe Update and Cloud Services
If you have any Adobe software installed, you will get a pesky little icon throwing updates at you from time to time. If you open Activity Monitor, you will find a process AAM Updates Notifier in the background. Furthermore, you may also additionally get Adobe Cloud, and unless you want to be permanently involved with the community, you can disable both of these.
The files that are needed to be changed can be found at:
/Library/LaunchAgents/com.adobe.AAM.Updater-1.0.plist
/Library/LaunchAgents/com.adobe.AdobeCreativeCloud.plist
you can edit these files and change the RunAtLoad value to false:
  <key>RunAtLoad</key>
  <false/>
Format to FAT32
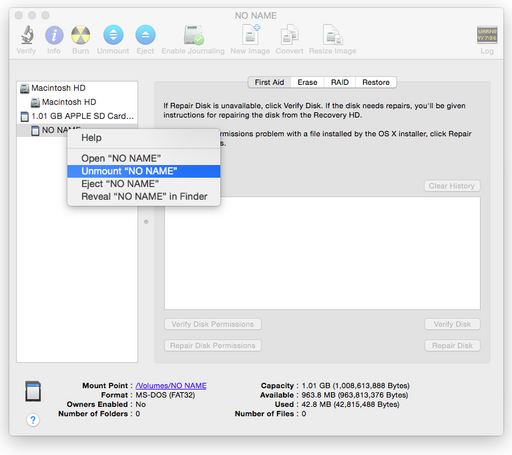
By default, the Disk Utility in OS X only allows you to create partitions formatted with FAT16. In order to format to FAT32 on OS X, you will need to perform the following steps.
- With the disk inserted, issue the
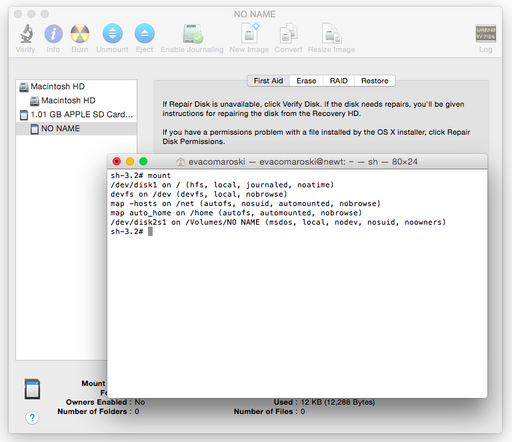
mountcommand asrootwhich will give you the partition that you want to format to FAT32:
sh-3.2# mount
/dev/disk1 on / (hfs, local, journaled, noatime)
devfs on /dev (devfs, local, nobrowse)
map -hosts on /net (autofs, nosuid, automounted, nobrowse)
map auto_home on /home (autofs, automounted, nobrowse)
/dev/disk2s1 on /Volumes/NO NAME (msdos, local, nodev, nosuid, noowners)
Note that the partition in this case is /dev/disk2s1 so make a note of this.
- Now
unmountthe partition from Disk Utility - do noteject.
- Finally, remembering that
/dev/disk2s1was the partition you wanted to format, using a terminal as root issue:
newfs_msdos -F 32 /dev/disk2s1
where /dev/disk2s1 is the partition you want to format.
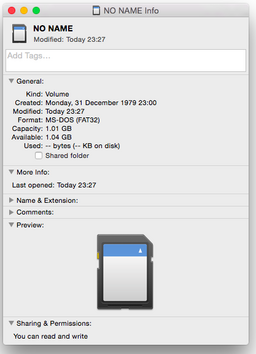
- To check, right-click the partition in Finder and choose
Get Info. You should see that the filesystem is FAT32.
Enable Loading Unsigned Kernel Extensions
Issue as root:
nvram boot-args="debug=0x146 kext-dev-mode=1"
which will enable development for kernel extensions and then reboot.
Disable System Integrity Protection
With the release of El Capitain, Apple introduced another ridiculous feature comparable to the other abomination called "Gateway Security" - the one that allows only signed applications to run. This new feature called System Integrity Protection (SIP) enforces different policies that even root cannot override without SIP being disabled.
To disable this monstrosity, you will have to:
- Boot in recovery mode by rebooting and then hold down ⌘+R
- Go to
Utilities->Tools->Terminaland launch a terminal. - Issue
csrutil disable. - Reboot back again into normal mode and issue
ls -lO /System /usrand look for therestrictedstring which should indicate whether SIP is enforced.
You can also partially disable SIP:
| Policy | Command |
|---|---|
| Allow installation of unsigned kernel extensions. | csrutil enable --without kext |
| Disable filesystem protections. | csrutil enable --without fs |
| Disable debugging restrictions. | csrutil enable --without debug |
| Disable DTrace restrictions. | csrcutil enable --without dtrace |
| Allow writing to NVRAM. | csrutil enable --without nvram |
 This annoying "feature" is most likely another episode out of the war that Apple wages on software developers which makes you a civilian victim as an unfortunate consequence. Sooner or later Apple is going to ship an operating system as a black box where you will not be able to modify it in any way - perhaps mounting root remotely over NFS, nor own any legal right to anything and all your junk will be living in "the cloud".
Oh, hang on, isn't that almost iOS? Well, not quite there yet.
Disable Startup Chime
To disable the startup chime, as root, execute:
nvram SystemAudioVolume=%00
(yes, indeed, two 0s, as retarded as it seems)
Then, to restore the chime:
nvram -d SystemAudioVolume
Encrypt Disk Without FileVault
You can encrypt your entire disk using a password under any OSX after Lion. In order to do that, you will have to reboot in recovery mode. You can accomplish that by rebooting the machine whilst keeping down ⌘+R (or holding down Alt during reboot and selecting the recovery partition).
Once the recovery interface has loaded, select Terminal from the Utilities menu (resize it and make it large) and look-up the disk you want to encrypt by issuing:
diskutil list
You will see several disks most likely and you are looking for something like:
#               TYPE NAME             SIZE   IDENTIFIER
...
3: Apple_CoreStorage Macintosh HD      800GB  disk0s3
...
so your main disk identifier is disk0s3.
You then issue as root:
diskutil cs convert disk0s3 -passphrase password
Where password is the password you would like to use to encrypt the disk.
You can now issue:
diskutil cs list
and watch the conversion process, for example:
Conversion Progress: 66%
If at a later time you decide to change the password, this can be similarly done with the command:
diskutil cs changeVolumePassphrase 5D9D5BB5-3E68-461A-971A-D549DB7D11D8
where 5D9D5BB5-3E68-461A-971A-D549DB7D11D8 is the encrypted volume UUID which can be retrieved with:
diskutil cs list
It should be the last one in the tree from the output.
In order to revert and unencrypt the volume, you would have to boot in recovery mode and use a terminal. First get the UUID of the disk by issuing:
diskutil cs list
then, unlock the volume:
diskutil cs unlockVolume 5D9D5BB5-3E68-461A-971A-D549DB7D11D8 -stdinpassphrase
where 5D9D5BB5-3E68-461A-971A-D549DB7D11D8 would be the UUID of the disk.
Finally, revert the volume to an unencrypted phrase with:
diskutil cs revert 5D9D5BB5-3E68-461A-971A-D549DB7D11D8 -stdinpassphrase
Add Some Plausible Deniability to FileVault 2
FileVault 2 encrypts the entire disk and relies on a configured user to unlock the drive during EFI boot - which is different from encrypting the whole disk using a single passphrase. Unfortunately, during boot, a list of users show up along with their icons and the prompt cannot be changed to a username and password prompt instead. However, using fdesetup you can configure the user that is allowed to unlock the machine during EFI boot. We can perhaps use this to our advantage in order to add some plausible deniability to FileVault 2.
First add a different account - an account that will be seen during EFI boot by going to System Preferences->Users & Groups and creating a new user for the machine.
After that, you can add the new account to the list of users allowed to unlock the machine by elevating privileges to root and then running:
fdesetup add -usertoadd USERNAME
where USERNAME is the user-name of the user you just created.
The next part is to issue the command for all user-names on the machine:
fdesetup remove -user USERNAME
where USERNAME is the name of the user-name.
The last step is to go to System Preferences->Users & Groups->Login Options and make sure that Display login window as: is set to Name and password.
Change Login Wallpaper on Yosemite and El Capitan
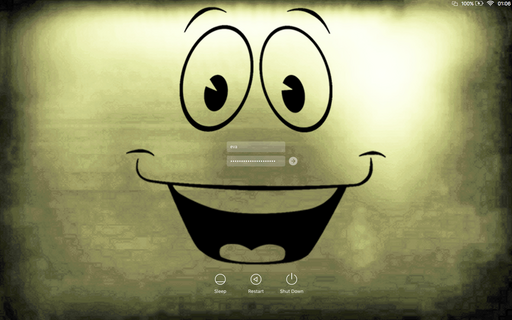
The login wallpaper is usually generated by OSX as a blurred copy of the last user's wallpaper. However, the login wallpaper can be changed by going to /Library/Caches/ and overwriting the file com.apple.desktop.admin.png with a different PNG file - make sure that the size of the picture you overwrite the file with has the same dimensions as your screen.
Here is an example of what your login screen could look like:
and here is the wallpaper if you like it:
It is a mix of the PipBoy with a StealthBoy allure from the Fallout Series by Bethesda Softworks.
Login Screen Tricks
At the login-screen you can type the following user-names for the corresponding desired effect:
| Username | Effect |
|---|---|
>console | Drops down to a terminal where you can log-in and execute commands. |
>restart | Restarts the machine. |
>power | Powers off the machine. |
>exit | Restarts the login server. |
Flush DNS Cache
After working with DNS and DHCP servers, OSX may need the cache flushed such that it picks-up the changes. The following table gives the respective command for different OS versions.
| OSX Version | Command |
|---|---|
| 10.9.5- and 10.10.4+ | killall -HUP mDNSResponder |
| 10.10 to 10.10.3 | discoveryutil mdnsflushcache |
| 10.6 - 10.8 | dscacheutil -flushcache |
Managing Access Control Lists (ACLs) from Command Line
OSX benefits from ACLs that are similar to POSIX ACLs and allow more fine-grained control over the standard Unix permission system.
Setting ACLs
This can be performed with an +a parameter passed to the chmod command. The syntax is:
chmod +a "[USER|GROUP] allow [permission[,permission,...]]" /path/to/file
where:
USERis an user to apply the permissions for.GROUPis the group to apply the permissions for.permissionis an ACL permission.
List of Commonly Used Permissions
- Full access for directories:
list,add_file,search,delete,add_subdirectory,delete_child,readattr,writeattr,readextattr,writeextattr,readsecurity,writesecurity,chown,file_inherit,directory_inherit
- Read/Write for directories:
list,add_file,search,delete,add_subdirectory,delete_child,readattr,writeattr,readextattr,writeextattr,readsecurity,file_inherit,directory_inherit
- Read Only for directories:
read,execute,readattr,readextattr,readsecurity
- Full access for files:
read,write,execute,delete,append,readattr,writeattr,readextattr,writeextattr,readsecurity,writesecurity,chown
- Read/Write for files:
read,write,execute,delete,append,readattr,writeattr,readextattr,writeextattr,readsecurity
- Read only for files:
read,execute,readattr,readextattr,readsecurity
Listing Current ACL Permissions
The command:
ls -le /path/to/file
will list the current ACLs set on /path/to/file.
Clearing ACL Permissions
The command:
chmod -N /path/to/directory
will clear any set ACLs from the folder or file at /path/to/directory.
Copy Remote File Contents to OSX Clipboard using OpenSSH
pbcopy is an indispensable tool on OSX that copies standard input (stdin) to the OSX clipboard. Usually, on an OSX machine you could copy a file to the clipboard so you can paste it using ⌘+V to a different location. For example, after issuing:
cat /etc/profile | pbcopy
you would have copied the contents of /etc/profile to your clipboard so you can paste it somewhere else.
Unfortunately, pbcopy will not be available when you SSH into a different machine, so, to work around that, you can send the contents of a file to your OSX machine via OpenSSH and then pipe the contents to pbcopy. For instance, suppose you are logged-in to a Linux machine via SSH and you want to transfer the contents of /etc/aliases from your Linux machine to your OSX machine. You would issue:
cat /etc/aliases | ssh you@osxmachine.com pbcopy
where:
youis the username on your OSX machine,osxmachine.comis the hostname (or IP address) of your OSX machine
Note that you may have to enable SSH in OSX in order to be able to connect to your machine. You can do that by going to System Preferences->Sharing and place a tick next to the Remote Login box.
Copy Files Keeping Both
On OSX a hidden option is to copy files from one location to the other whilst keeping both files without overwriting. This can be achieved by holding down the option key ⌥ when the Skip, Stop, Replace buttons are shown on the replacement dialog. The Skip button will change into Keep Both.
OpenSSH Forwarding Locale from OSX to Linux
When connecting via SSH from OSX to Linux with a different locale, you may get the following errors:
perl: warning: Setting locale failed.
perl: warning: Please check that your locale settings:
	LANGUAGE = "ru_RU:ru",
	LC_ALL = (unset),
	LC_CTYPE = "UTF-8",
	LANG = "ru_RU.UTF-8"
    are supported and installed on your system.
perl: warning: Falling back to a fallback locale ("ru_RU.UTF-8").
locale: Cannot set LC_CTYPE to default locale: No such file or directory
locale: Cannot set LC_ALL to default locale: No such file or directory
The solution is to stop OSX forwarding the locale by editing /etc/ssh/ssh_config on the Mac and commenting out the line:
SendEnv LANG LC_*
Or, using sed, by issuing on the Mac as root:
sed -i -e '/SendEnv/ s/^#*/#/' /etc/ssh/ssh_config
For the contact, copyright, license, warranty and privacy terms for the usage of this website please see the contact, license, privacy, copyright.
