Table of Contents
Shortnote
Some grids grow beyond the space that we have allotted and we sometimes need to expand them. To check:
df -h
the -h flag stands for human-readable format. The result will show how much space the virtual drive supports and how much is occupied, as well as percentages. For example:
Filessytem  Size    Used    Avail   Use%	Mounted on
/dev/sda1   27G     7.4G    19G     29%     /
The / indicates that the root is on /dev/sda1 and is 29% full.
It seems that the main issue is that the MySQL database grows out of proportion due to the asset uploads. To check this we do:
cd /var/lib/mysql
du -smh
and the numeric result is measured in MB.
Expanding the VDI
To expand the VDI file, we shutdown the VM and, given a Windows host, we need to use VBoxManage. First we change the directory to where the VMs are located:
cd C:\Users\OpenSim\VirtualBox VMs\Alexandria\
then, we expand the VDI disk file to 30GB using:
"C:\Program Files\Oracle\VirtualBox\VBoxManage.exe" modifyhd "Alexandria.vdi" --resize 30000
Partitioning
However, this does not also increase the partition sizes on the VDI.
Thus, we need to download the Live ISO for something like parted magic, attach it to the virtual box instance, and boot from the Live ISO.
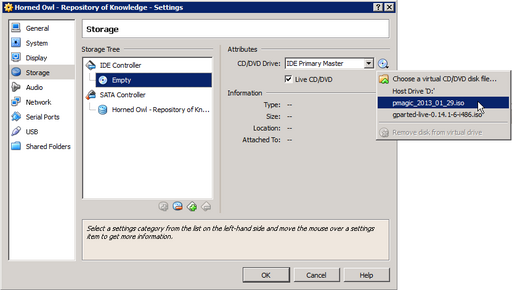
After downloading, we attach the ISO to the VM:
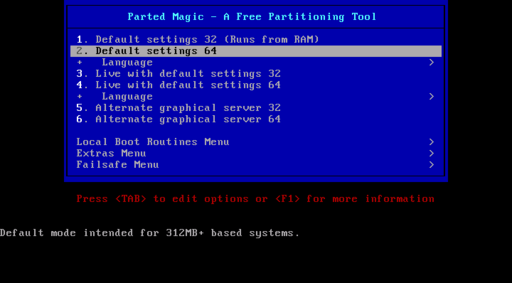
and then boot the VM so that it boots from the CD/DVD drive:
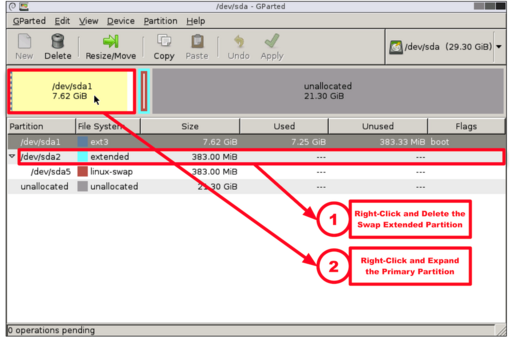
Choosing either 32bit or 64bit, parted magic will boot and eventually reach the desktop. We then run gparted (an icon on the desktop called Partition Editor).
The procedure is as follows:
- If there is some swap space between the root partition (
/dev/sda1in the image above) and the unused space, delete the swap partition. It is perfectly safe to delete the swap partition since it does not contain any essential data. On the other hand, be careful with the/dev/sda1partition since it contains the whole filesystem. - Expand the drive so it is extends into the
unallocated spaceand leave1GBor2GBso that the swap partition can be recreated.
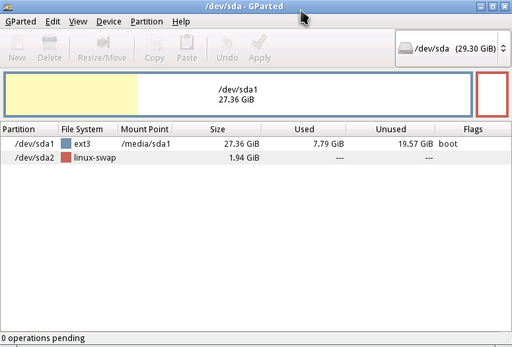
The results would look like this for a root partition and swapspace:
Note that the initial partition layout was:
| Partition | Purpose |
|---|---|
/dev/sda1 | root partition (/) |
/dev/sda2 | swap partition |
Since we just resized the disk and did not change the order of partitions, the layout is still the same. In case you modify the order of the partition, the bootloader, either LILO or grub may not be able to find the root partition. That is because LILO and grub use configuration files where the partitions are defined. If it expects to boot off the root partition at /dev/sda1 and the root partition got moved during partitioning to, say, /dev/sda3, the system will not boot.
When done, remove the ISO from the CD/DVD icon in the Virtual Box window and shutdown the VM. When the VM is booted up again, the partitions will have been resized.
For the contact, copyright, license, warranty and privacy terms for the usage of this website please see the contact, license, privacy, copyright.


