Table of Contents
About
One of the most straightforward tasks concerning resizing disk images in order to get rid of the "free space" is entirely counter-intuitive on a Mac. Even though the (nerfed) Disk Utility provides a way to resize an image, Disk Utility will pop-up a requester asking the user to what size an image should be shrunk which is borderline incompetent since, in most usage scenarios, the user just wants to shrink the image to its minimal size. Furthermore, most console-fu such as the compact option of hdiutil on sparsebundles simply, either does not do what is expected, nor does it do whatever it does correctly such that most likely hdutil will say that it managed to spare 0 bytes out of hundreds of megabytes - and that is unacceptable.
This guide is a series of notes on how to properly resize an image properly to its minimal size using both Disk Utility and the command line. It involves using the crippled Disk Utility included on MacOS releases above Snow Leopard.
Dumping or Creating an Image
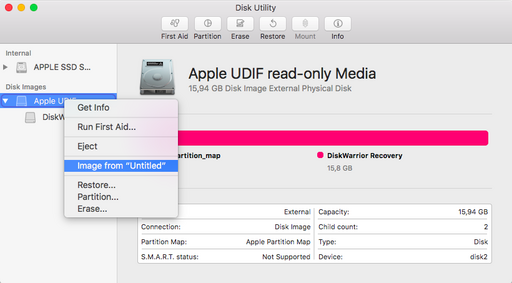
Most disk images available will be read-only such that you will have to create a read-write image in order to be able to shrink any volumes in the disk image. In order to do that, mount your disk image by double-clicking it and then fire up Disk Utility in order to proceed with the following steps:
- Right-click the disk image on the left pane of Disk Utility and select
Image from [...](the name of your disk image will be in the menu selection.
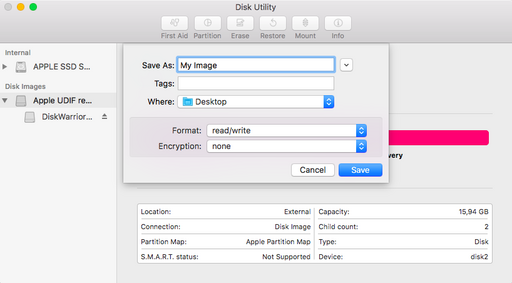
- The next pop-up will ask you where to save the image, say
Desktop, the name of the image (can be anything), but make sure that the format isread/write.
- Disk Utility will now dump and create a read-write the image to the specified location.
- Unmount the read-only image by clicking the eject icon next to the disk image and then exit Disk Utility.
Preparing the Read-Write Disk Image
- Double-click the resulting read-write image and let it mount.
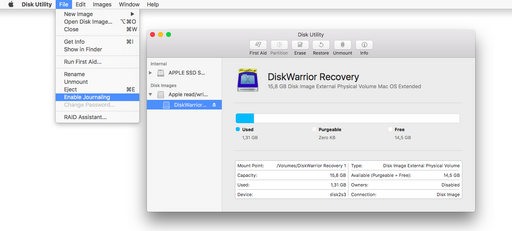
- Fire up Disk Utility again and you should see the mounted read-write image on the left pane. With the volume that you want to shrink selected, you need to enable journaling from the
Filemenu.
This concludes the last step of using Disk Utility. Note that, in the illustration:
- the image is roughly 15GiB large with only 1.31GiB occupied.
- the volume device is
/dev/disk2s3
and that we are now going to shrink this image to its minimal size (1.31GiB).
Shrinking the Read-Write Disk Image
The next steps take place in a terminal so open a terminal and use su to change to the root superuser. Let us list all identified disks and partitions by using diskutil - issue as root in the terminal:
diskutil list
This will result in a list of disks, volumes, etc... Towards the end of the list, you should find your mounted disk image. Following the example, we have:
/dev/disk2 (disk image):
   #:                       TYPE NAME                    SIZE       IDENTIFIER
   0:     Apple_partition_scheme                        +15.9 GB    disk2
   1:        Apple_partition_map                         32.3 KB    disk2s1
   2:                  Apple_HFS DiskWarrior Recovery    15.8 GB    disk2s3
As stated, we want to shrink disk2s3 from 15GiB to the minimal size - but we do not know the minimal size yet. To find out the possible minimal size, issue:
diskutil resizeVolume disk2s3 limits
where disk2s3 is the volume device of the disk image to be shrunk. Issuing the command above, and assuming you have enabled journaling in the previous section, the output, following the guide, will be:
Resize limits for partition disk2s3 DiskWarrior Recovery:
  Current partition size on map:              15.8 GB (15804096512 Bytes)
  Minimum size (constrained by file usage):   1.3 GB (1331929088 Bytes)
  Recommended minimum size (if used for OS):  6.7 GB (6700638208 Bytes)
  Maximum size (constrained by map space):    15.8 GB (15804096512 Bytes)
As you can observe, the command tells us that the minimal size is 1.3GiB - however, we know that 1.3GiB is not exactly right since Disk Utility reported 1.31GiB. To be exact and to properly trim down the image, we are going to use the value in bytes 1331929088 instead of the human-readable size of 1.3GiB.
To shrink down the image, following this guide, issue:
diskutil resizeVolume disk2s3 1331929088
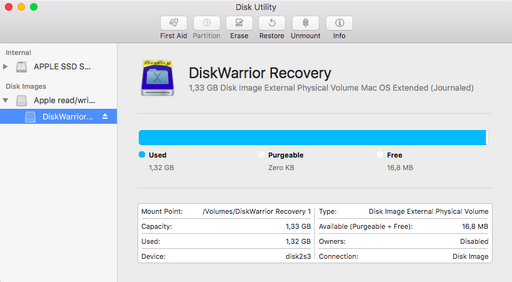
After some operations, the newly resized image will be mounted and we can now see that the new size is acceptable.
For the contact, copyright, license, warranty and privacy terms for the usage of this website please see the contact, license, privacy, copyright.


