Generating and Using Keys to Log-in with PuTTY
Logging in remotely with SSH using keys instead of passwords can be achieved on Windows using the PuTTY program.
The process involves generating a key pair which can be done with "PuTTYGen", a program that is distributed with PuTTY itself, that allows the user to generate a private and public key pair.
The private key will be used on the local machine needing to log-in remotely whilst the public key will be distributed to the server to log-in remotely to. If the remote system is a Linux machine, the public key will be added to a file named authorized_keys that should be found inside the user's home directory under the .ssh folder on the server. If a .ssh folder does not exist in the user's home folder, then the command ssh-keygen can be used to generate the initial folder structure and after that the public key can be added to the authorized_keys file.
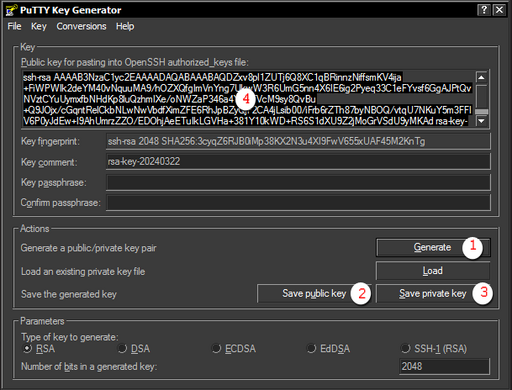
The being said, PuTTYGen can be launched and then the "Generate" button must be pressed such that PuTTYGen will start gathering entropy to generate the keys. PuTTYGen will ask the user to move the mouse in order to generate some more entropy.
When the process is complete, a public key is generated inside the "Key" textbox and that public key is the one to add to the authorized_keys on the server.
In any case, it's a good idea to save both the public and private keys, so the buttons "Save public key" and "Save private key" should be used to store the files locally somewhere. Note that in case the private key is compromised or lost on the local machine, then logging into the server will be impossible unless the user manages to get the administrator to either allow them to login with a password or a new key pair can be generated and added to the authorized_keys file.
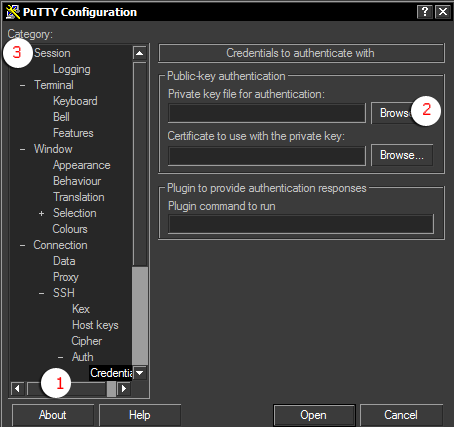
PuTTYGen is not needed anymore and PuTTY can be launched to set up the connection. From the main screen and then on the left panel, the Connection->SSH->Auth->Credentials option should be chosen. Then, the private key file can be selected by clicking the "Browse" button next to the "Private key file for authentication" textbox. When that is done, the authentication part is complete and nothing else is needed, so from the left panel, the very first menu option labeled "Session" is chosen.
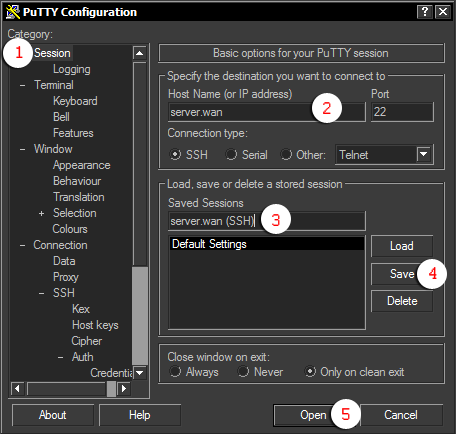
On the "Session" screen, the hostname or the IP address along with the port can be specified and should match the SSH connection details for the server. Note that PuTTY resets all the options on restart, such that the lower box "Saved Sessions" should be used by entering a name and then clicking the "Save" button on the right in order to save all the connection details.
Finally, if everything looks correct, the "Open" button can be clicked in order to open up a connection to the server. If everything goes smoothly, the server should prompt for an user name.
Finally, after the user name is entered, there should be no prompt to enter a password and the user should log in directly. PuTTY will hint that the login was performed using keys, for example, by saying "Authenticating with public key" after the user name is entered.
For the contact, copyright, license, warranty and privacy terms for the usage of this website please see the contact, license, privacy, copyright.


