Table of Contents
Definitions
- Maximum possible energy gain granted by objects and object enhancers:
| Objects | Maximum Energy |
|---|---|
| Bed | 23 |
| Toilet | 6 |
| Shower | 13 |
| Bathtub | 20 |
- All bathtubs cost simcash irrespective of completed collections.
- There are three forms of currency: simoleons, llama points and simcash.
- Only llama points cannot be bought using real-life currency.
- All currencies can be earned by playing; in order of difficulty: simoleons, llama points and simcash.
- Objects can be classified in two categories: decorative items and all other items.
- Decorative items have no practical use.
- All other items do not stack with other items from the same subset category.
- All sims have a maximum of
 energy.
- In case the energy of a sim is less than
 , then using an energy recharge object will stack beyond
  energy for the sim to be expended at the earliest convenience - further stacking will not be allowed.
- Cupcakes can regenerate energy:
 cupcake can restore
  energy,
 cupcakes give a boost to any event.
- Home item collections can be mixed together seamlessly and any bonuses will stack regardless of the combinations.
- Sims can perform hobbies, work or socialize.
Attaining Maximum Energy Recharge for All Objects
For all energy recharge objects (beds, toilets, showers and bathtubs) the energy gain can be maximized by purchasing enhancer objects however, two objects of the same type will not stack and just one item of a type will contribute towards the energy recharge gain.
In other words, in order to attain maximum energy recharge for one of the energy recharge objects, one of each energy enhancing objects must be bought. Purchasing two mirrors from different home item collections will not stack together.
As an example, the energy recharge from the bed can be enhanced by purchasing the following items:
| Energy Enhancing Objects | Contribution | Cost Type |
|---|---|---|
| Nightstand | 1 | simoleons |
| Dresser | 2 | |
| Lamp | 2 | |
| Mirror | 3 | |
| Alarm Clock | 2 | simcash |
Where all beds provide a base energy recharge of  .
.
Quick, Standard and Long Event Gains
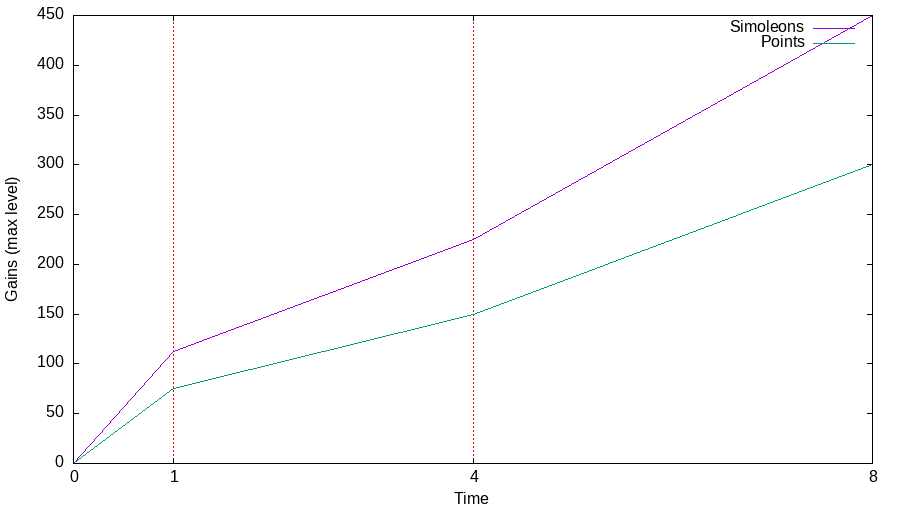
Performing events yields Simoleons and points pertaining to the activity type (hobby, career, relationship). Three type of events are available for each activity type: quick, standard and long where each event type differs from the rest by the amount of time it takes to complete.
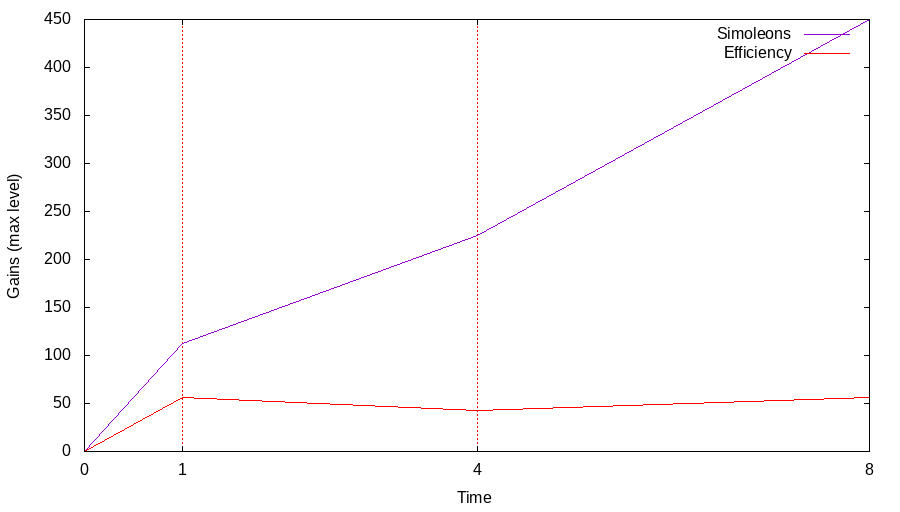
The gains for all event types, considering that all the gains are obtained at a maximum level of the activity type (level  ), can be represented in time where the time is represented on a logarithmic scale:
In order to determine the gains for each different event quick, standard and long we can integrate by measuring the area of the triangles under each event type and divide the area by the total time.
For instance, for Simoleons, the following triangles from the values on the chart can be obtained:
![LaTeX
\begin{tikzpicture}
% grid
\draw[help lines] (-2,-2) grid (2,2);
% origin
%\draw[red, line width=.1mm] (-0.1,-0.1) -- (0.1,0.1)
% (0.1,-0.1) -- (-0.1,0.1);
%\coordinate[label={[red]above:$O$}] (O) at (0,0);
% coordinates
\coordinate[label={[black]left:$A_{q}(0,112)$}] (A) at (-1,1);
\coordinate[label={[black]below:$B_{q}(1,112)$}] (B) at (1,1);
\coordinate[label={[black]right:$C_{q}(0,0)$}] (C) at (-1,-1);
% triangle
\draw[magenta, line width=.1mm] (A) -- (B) -- (C) -- cycle;
% alpha
\markangle{A}{B}{C}{3mm}{3mm}{$\alpha$}{cyan}{north}
% braces
%\drawbrace{B}{C}{2mm}{blue}{$a$}{0}{-4mm}{mirror}
%\drawbrace{A}{B}{2mm}{green}{$c$}{-4mm}{0}{mirror}
%\drawbrace{A}{C}{2mm}{red}{$b$}{3mm}{3mm}{}
\end{tikzpicture}](/lib/exe/fetch.php?media=wiki:latex:/imgabb8bfc8c1140f7f9ecd1fb2f67a289f.png)
![LaTeX
\begin{tikzpicture}
% grid
\draw[help lines] (-2,-2) grid (2,2);
% origin
%\draw[red, line width=.1mm] (-0.1,-0.1) -- (0.1,0.1)
% (0.1,-0.1) -- (-0.1,0.1);
%\coordinate[label={[red]above:$O$}] (O) at (0,0);
% coordinates
\coordinate[label={[black]left:$A_{s}(1,225)$}] (A) at (-1,1);
\coordinate[label={[black]below:$B_{s}(4,225)$}] (B) at (1,1);
\coordinate[label={[black]right:$C_{s}(1,112)$}] (C) at (-1,-1);
% triangle
\draw[magenta, line width=.1mm] (A) -- (B) -- (C) -- cycle;
% alpha
\markangle{A}{B}{C}{3mm}{3mm}{$\alpha$}{cyan}{north}
% braces
%\drawbrace{B}{C}{2mm}{blue}{$a$}{0}{-4mm}{mirror}
%\drawbrace{A}{B}{2mm}{green}{$c$}{-4mm}{0}{mirror}
%\drawbrace{A}{C}{2mm}{red}{$b$}{3mm}{3mm}{}
\end{tikzpicture}](/lib/exe/fetch.php?media=wiki:latex:/imga9e617a51ada4c5438e3ec7a8809b844.png)
![LaTeX
\begin{tikzpicture}
% grid
\draw[help lines] (-2,-2) grid (2,2);
% origin
%\draw[red, line width=.1mm] (-0.1,-0.1) -- (0.1,0.1)
% (0.1,-0.1) -- (-0.1,0.1);
%\coordinate[label={[red]above:$O$}] (O) at (0,0);
% coordinates
\coordinate[label={[black]left:$A_{l}(4,450)$}] (A) at (-1,1);
\coordinate[label={[black]below:$B_{l}(8,450)$}] (B) at (1,1);
\coordinate[label={[black]right:$C_{l}(4,225)$}] (C) at (-1,-1);
% triangle
\draw[magenta, line width=.1mm] (A) -- (B) -- (C) -- cycle;
% alpha
\markangle{A}{B}{C}{3mm}{3mm}{$\alpha$}{cyan}{north}
% braces
%\drawbrace{B}{C}{2mm}{blue}{$a$}{0}{-4mm}{mirror}
%\drawbrace{A}{B}{2mm}{green}{$c$}{-4mm}{0}{mirror}
%\drawbrace{A}{C}{2mm}{red}{$b$}{3mm}{3mm}{}
\end{tikzpicture}](/lib/exe/fetch.php?media=wiki:latex:/imgdfcd2d8457c5c09d0f6d234f38b3081a.png)
The areas for each right-angle triangle in part is thus:

where  is a placeholder for the event type:
 quick, standard, long.
Calculating numerically, the area for each triangle is obtained as:
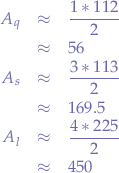
and dividing the area for each triangle for all event types  ,
,  and
and  over the total amount of time
  , an efficiency formula can be derived as:

When the numerical values are substituted, the following values for all event times are obtained:
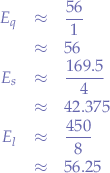
Overall, it seems that quick event types provide the best reaps over the time cost, players seem to benefit the least from the standard event type, the long event type provides some improvement over standard and is only marginally above the quick event type in gains. The curves for career, respectively hobby and relationship points seem to follow the simoleons curve in slope such that from the point of view of efficiency, the same conclusions can be met and players should stick to spamming quick event types.
An observational remark that would back up favoring quick event types is that other stuff may be happening during the gameplay that would require a sim to be available and the quick event type takes the least amount of time such that the sim can free itself earlier.
The reason that the long event type reaps the same gains over time as the quick event type could possibly be a rationale of the developers that provide a bit better than the same reward for quick event types to players that would like to keep playing but do not have the time to continuously spam quick even types.
Purchasing Furniture
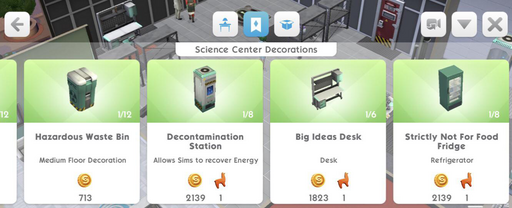
Overall, furniture marked as decoration is purely aesthetic and does not provide any special interaction. For example, in the screenshot below:
- the
Hazardous Waste Bindoes not provide any utilitarian benefit whatsoever, - the
Decontamination Stationis labeled as allowing sims to recover energy (and does what it says), - the
DeskandRefrigeratorare not labeled as aDecorationbut as aDeskandRefrigeratorrespectively such that both objects will at least provide the opportunity of interaction with a sim
The same pattern applies whether the objects are career, hobby or home items - particularly, a lot of home items, even paid-for with simcash items, are marked as decoration and buying them could only possibly increase the Lifestyle Score (the latter being increased by any purchase implicitly anyway) such that buying decorations should not be prioritized.
Rush Strategy
A peace-of-mind strategy to use when starting Sims Mobile is to perpetually complete careers, hobbies or relationship stories, perhaps even by picking the long event types in order to achieve a steady income of simoleons and simcash whilst avoiding to spend money on anything but the essentials (particularly, items that regenerate the energy of sims).
The goal and priority should be to unlock the next two sim slots and to obtain two more playable sims. In doing so, the amount of total household income just outright doubles (2 sims for free, 2 extra sims). Only after ensuring the maximal income, other endeavors should be pursued.
The next two remaining sims slots should be unlocked in the following manner that ensures the least amount of time spent:
- for the third slot, complete the Roommate quest,
- for the fourth slot, buy the slot with the simcash obtained on the way.
The Relationship Event Type
Under the definitions:
- a long event type can be performed by a sim with
 energy at its disposal and excluding energy recharging objects,
 - a long event type takes
 hours to complete,
 - in a relationship event, iff both sims are playable, then both sims can trigger actions for the relationship event that contribute towards its completion
Let there be the following cases:
- a sim performs a long event type by interacting with objects,
- a sim performs a long event type by interacting with another playable sims
Such that:
- in the first case, the sim has
 energy to expend in
  hours in order to complete the event,
 - in the second case, both sims have
 energy to expend in
  hours in order to complete the event.
In conclusion, relationship event types should be favored given that both sims can contribute towards the completion of the event whilst the player benefits from the energy pool of both sims.
Furthermore, and by observation, particular quests, precisely quests in context of the player's household sometimes grant extra bonuses towards the completion of the quest. For instance, two sims that have been previously married have all times reduced to half for the entire Baby Quest - the time for the completion of intermediary steps are reduced from  hours to
  hours.
Unfortunately, there are no three-way relationship event types to benefit from even larger energy pools. 
Politics (The Fun Section)
- There is no private property nor personal property; all other sims can benefit from either private or personal property,
- No castle laws; there is no way of even stopping other sims from entering your house, the door being really just cosmetics,
- Sims get paid by the state for relationships and hobbies,
- Private businesses exist (careers) as well as upward mobility within the career with ensuing better wages.
- Sims use their own currency to buy objects that enhance work and speed up events,
- Sims can have traits that boost their work efficiency and the traits can be exchanged at will,
- All sims are entirely equal in all terms,
- Children between same-sex couples are provided by the state (via the stork),
- Dividends are paid out periodically by the state in goods and currency,
- There is a hierarchy expressed by the accumulation of material goods and upward mobility is performed by the accumulation of goods,
- There is no form of coercion other than coercion through economical means that acts implicitly to hamper upward mobility,
- An looming sense of overwhelming cynicism where all actions performed by sims are based on a play of words, tropes, irony and lack of interest or depth (ie: "Watch predictable detective TV show...", "Stir, stir, stir...", "Use a pinch and a dash...", "Answer nature's call...", "Watch music award song...", "Attempt perfecting entree...", etc.) even though the actions performed are meant to achieve the opposite of cynical belief. However, the actions themselves are labeled by the narrator and not by the sims themselves! The sims seem enthused by all the actions and seem authentic.
State socialism?
Best Career
Overall and by far, the best career to pick in sims mobile seems to be the Barista career. The reasoning for picking the Barista career hinges on the following observations:
- compared to any other career, the barista career reaches its maximum level at half of all the other careers, namely at level 5 such that it is the best career to quickly complete in order to finish the "reach mastery in a career" quest,
- even though the barista career generates almost half the income of other careers (
 vs
vs  ), all events take the least amount of actions to be performed when actively playing; for instance, about two quick events can be completed in any other career with the fixed energy pool of
 30while for the barista career, about three or four quick events can be completed in the same time,- perhaps the most important consequence of being able to finish events faster is that Llama points that rely on completing events can be generated way faster than with any other career,
- another important consequence is that many quests require "completing events", generically, such that quests or part of quests can be completed faster,
- traits that affect cooking are considered common, even the maxed out
Foodie IIIis considered a common trait while all the other career boosters, starting withCreativefor fashion and photography events are uncommon and thus more difficult to obtain.
Kids
Some users have been complaining that there are no children NPCs on various forums but it is easy to at least mimic the same effect: simply do not promote the children and let them running around. Kids and teens frequently allow starting quick relationship events that tend to yield one standard life ticket such that they become a good source of income. A trick is to have a bunch of kids and use that as leverage to complete relationship quests for llama points and to start racking up life tickets.
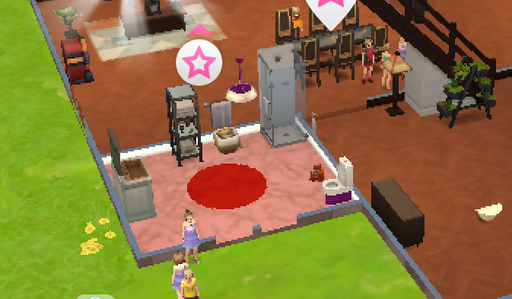
NPCs in general tend to run around the house and inside various rooms but bathroom items cannot be used to recharge energy whenever an NPC is inside the bathroom. Having a large amount of kids will occupy the bathroom frequently leading to bathroom items not being able to be used. One solution is to simply remove the door such that kids do not wander inside the bathroom - playable characters will still be able to reach inside the bathroom by clicking the bathroom items and game progression will eventually lead the playable characters out such that they will manage to escape the closed bathroom.
