Table of Contents
About
SCSI2SD drives can be tricky to handle: the firware is flakey, setting up SD cards is not well explained, the provided software works on and off, the settings are not explained properly and it is unsure what they do, the advertised speeds can never be realistically reached, etc.
The following guide is a short tutorial on setting up SCSI2SD with Amigas.
SCSI Bus
When connecting a SCSI cable to a SCSI host, each device on the line must be set to an unique ID. For instance, the following line represents a cable where the device with ID number 7 represents a SCSI host and the device with ID 0 is the last device on the SCSI bus.
ID: 7                ID: 1               ID: 0
+----------------------+------------------+
^                      ^                  ^
|                      |                  | terminator
| terminator           |
                       | no terminator
Furthermore, the endpoints of a SCSI bus must be terminated: either actively or passively. However, active and passive terminations of the SCSI bus must preferrably not be mixed. The devices in the middle must not have any sort of termination; only the devices at the extremes of the SCSI bus must have terminators.
The line above could be taken as a rough sketch of a Blizzard PPC device with ID 7 and a two slot ribbon cable running from the Blizzard PPC to two other devices with ID 1, respectively ID 0.
SCSI2SD
SCSI2SD devices are cable to split an SD card into many smaller drives. Each drive must have its own SCSI ID on the bus. However, SCS2SD devices are counter-intuitively incapable of using the whole SD card as a drive. Intuitively, breaking up an SD card into smaller drives is due to older SCSI controllers sometimes not being capable of recognizing drives over 2GiB.
Consequentially, if an entire SD card is to be used the SCSI2SD drive must be configured with exactly one drive and the drive parameters must be set correctly - note that even SCSI2SD v6 does not have the capability of automatically filling in sensible values, even with the SD card plugged in.
Configuring a SCSI2SD Drive
The software to configure or flash firmware to SCSI2SD v6 drives can be found on the producer's website or mirrored here:
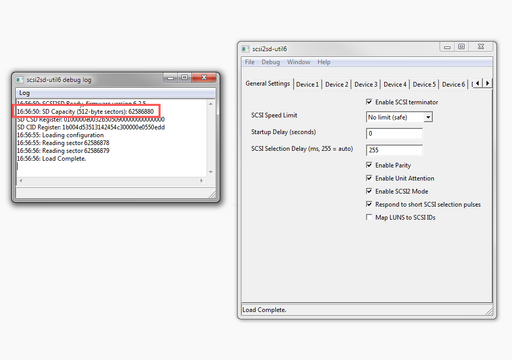
To configure the SCSI2SD drive, plug in the SD card and connect the drive via an USB cable and launch the scsi2sd-util6 tool (note that the name will be different for SCSI2SD drives with versions lower than 6). The debug log window will show the detected sector size of the SD card and it must be remembered for when a drive is configured.
General Settings
The settings in the following image should be compatible with Blizzard PPC SCSI or the Blizzard SCSI Kit MK-IV (except the termination setting, which should be made depending on where the drive is to be placed in the SCSI chain).
The following settings will have to be made:
Enable SCSI termination- SCSI2SD drives have active termination. In case the drive is the last device on a SCSI chain, thenEnable SCSI terminationmust be enabled. Otherwise, if the drive is somehwere in the middle of the chain, this option must be disabled.SCSI Speed Limit- the fastest possible on a SCSI chain is synchronous transfer but the SCSI controller must support synchronous transfers and all the devices on the chain must support synchronous transfers as well. This option is best left alone and configuring the SCSI controller is best done instead.Startup Delay (seconds)- depending on the SCSI controller, some controllers fail to recognize drives that start too soon. This option is best left alone.SCSI Selection Delay- another timing option that is best left alone.Enable Partity- partity checking, if supported by the SCSI controller, should add some error checking and correction to the entire SCSI bus. If the controller supports it (Blizzard PPC SCSI does) then this option should be enabled. In many situations it is safe to enable this option and only disable it if the drive does not work.Enabling Unit Attention- this is available only on SCSI2SD v6 drives and will allow hotplugging SD cards.Enable SCSI2 Mode- this option enables SCSI II mode and is more strict about the SCSI protocol; provided that the controller supports SCSI II, this option should be enabled (Blizzard PPC SCSI and the Blizzard SCSI Kit for the Blizzard MK-IV does have support for SCSI2).Respond to short SCSI selection pulses- as the setting would imply, on bootup, the SCSI controller will try to twiddle signals across the SCSI line to detect devices. Some controllers may do this obsessively such that one may want this option to be disabled. However, it is best enabled to make sure all devices are detected properly.Map LUNS to SCSI IDs- this option is mainly for SCSI expanders (?) and is best left off.
Drive Settngs
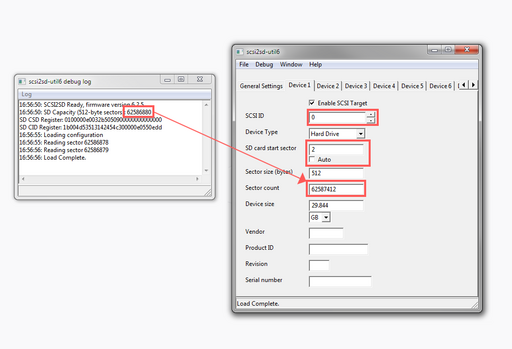
Assuming that an SD card of 32GiB has to be configured, the following settings are made:
- the SCSI ID has to be set to an unique value (ie: the Blizzard PPC SCSI is by default set to ID
7). - for Amigas, the
SD card start sectorshould be set to2withAutodisabled. - the
Sector counthas to first be copied from the Debug Log window and pasted into theSector countbox, after which the software might make some adjustments.
No other settings have to be made, except, perhaps, chaning the Product ID, Revision and Serial number - it is a good choice to generate a random number for the Serial number setting in order to ensure that each drive is unique and will not clash with other drives having the default 1234567812345678 serial.
Assuming that the entire SD card of 32GiB should be used as a single drive, all other devices in the tabs (Device 2, Device 3, Device 4, etc.) should have Eanble SCSI Target disabled.
Saving and Loading Settings
With all settings made, the menu item File->Save to device... can be selected to store the settings into the SCSI2SD flash ROM. Similarly, when a SCSI2SD device is connected, the settings may not appear immediately such that File->Load from device must be used to read the SCSI2SD flash ROM.
Using WinUAE to Setup The Drive
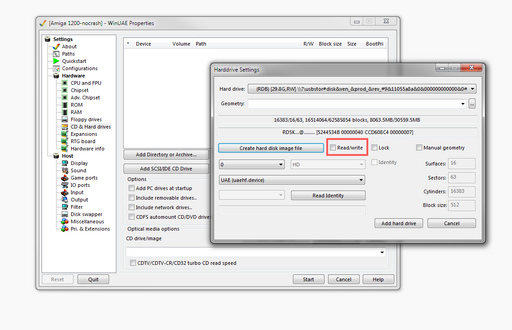
When connecting a SCSI2SD drive via USB with an SD card plugged in, the drive will show up as a letter in My Computer. It is possible to pull the SD card and use an adaptor to connect the SD to the PC without using the SCSI2SD drive at all however doing so may be problematic due to the way WinUAE handles SD/MMC bus cards: the SD card may happen to be available under WinUAE but the Read/Write option may be ghosted.
WinUAE documentation states that physical drives attached via WinUAE must not contain any partitions or else the drive cannot be attached with the Read/Write opton.
In case WinUAE refuses to allow the drive to be added with the Read/Write option then all partitions from the drive to prepare must be wiped. Removing partitions can be done via the Windows diskpart tool:
- open the command line as an administrator and issue
diskpartto start the partition manager, - enter
list diskto list the attached disks, - enter
select disk NwhereNis the disk number to prepare for WinUAE, - enter
cleanto strip the disk clean of all partitions.
Enabling Synchronous Transfers
Using the Phase 5 scsiconfig tool, after selecting the drive, the Synchron setting has to be enabled for the drive in order to use synchronous transfers. This option will be off by default.
Notes on SD Cards
SCSI2SD documentation states that up to 32GiB SD cards have been tested, however it should be possible to attach larger SD cards provided the same proceedure is respected.
microSDs with a microSD to SD adaptor can be used but seem a tad problematic when configuring the parameters: sometimes the Amiga cannot read the drive configuration (ie: using HDTools). Nevertheless, microSDs can be used.
The Amiga OS 3.1.4.1 update states that the filesystem block size when using HDTools, HDSetup or scsiconfig should be set larger than 512b and that an optimal value should be 4KiB (4096). A larger filesystem block size should also help flash storage better organize wear and tear levels internally.


